August 29, 2011
School Bus Cookies!
We have one glorious week of summer vacation left but we're starting to gear towards the beginning of the new school year. Enjoy my school bus cookies=)
Happy Decorating,

August 22, 2011
Coffee Flan for Mama
My mom is my biggest fan. There. I said it. And not because she’s my mom. Well…ok…maybe just a little because she’s my mom=)
She loves to sit at one end of the counter, throw me an impish smile and asks what that wonderful aroma is filling the air. Of course there isn’t anything baking=)
I’m guessing that fact throws her into panic mode and feels compelled to drop a not so subtle hint to ensure dessert at the end of our meals when either one of us is visiting!
She is a cook, not a baker. So the onus is on me to provide baked yummies!
So recently I made her a family favorite (amongst many favorites)…coffee flan! Very traditional, luxurious on the palate and super easy!
Coffee Flan
1 C sugar
4 eggs
1 C evaporated milk, undiluted
14 oz (1 can) condensed milk
¼ salt
½ C very strong coffee, cooled to room temp
Preheat oven to 350 F.
Cook the sugar in a heavy sauce pan over low heat and look for the sugar to melt into a gorgeous medium amber color, never dark.
Caramelizing the sugar correctly is key. If you kill this step you are guaranteed a bitter tasting flan. Ew.
How do you do this? Keep an eye on the saucepan! There are no shortcuts!
Should the melted sugar become very dark in some areas, chances are you’ve burnt the sugar. Start over.
Once you’ve caramelized the sugar, immediately coat the bottom of your custard cups or mold and set aside.
Whip up the rest of the ingredients in a blender; pour through a fine sieve and into your caramelized custard cups or mold.
Bake inside bain-marie for 45-50 minutes smack in the middle of the oven.
Check that the outside of the flan is firm but the center is slightly wiggly, that’s when it is done. The flan will continue to cook a bit longer once you’ve removed it from the oven and out of the bain-marie ensuring the perfect consistency.
If the center is firm, you’ve over baked your flan and it will have a tough, rubbery consistency. If the center is too wiggly, you’ll have a center that will sink once it has cooled.
Let the flan cool at room temp and then refrigerate for a minimum of 4 hours to overnight.
When transferring to a plate or platter, run a knife along the edge of your mold, place your serving plate on top then turn over. You may have to run hot tap water on the mold to loosen the caramel. Ta-daa and there you have it, coffee flan!
Happy Baking,

August 12, 2011
Making Ice Cream Cone Cake Pops with Kids Pictorial
Our summer has been a blur of BBQ’s, pool and lakeside gatherings. Jordan’s swim meets were exciting but have now come to a close and our big girl, Cammie, is all done with summer camp. Whew! Now what do I do with them?
With a short lull in between leaving for a much needed family getaway, my waterlogged girls were antsy for something to do other than their summer reading=D What better than to make cake pops like the wonderful, loaded with cuteness, Bakerella!
Angie’s ice cream cone cake pops has made fanatics out of us and I experienced the perfect “Hey Ferb! I know what we’re going to do today!” moment! I know, I know…way too many cartoons=)
Because children want instant gratification and moms want peace, quiet and a relatively clean kitchen, I decided to skip making the cake balls and opted for donut holes. For you purist out there, sorry.
You’ll need:
Donut holes
Chocolate wafers in pink and chocolate brown
(either Merkens or Wilton’s)
Sugar cones
Sprinkles
Mini M&M’s
Saw 1/3 off the top of the sugar cones with a steak knife.
Melt the pink chocolate wafers.
First, dip the rim of the sawed off sugar cone.
Then you place the donut hole on top to “adhere and set”.
My girls found it easier to spoon the melted chocolate over the donut hole as opposed to directly dipping it into the bowl.
While the pink chocolate is still soft, sprinkle on your sprinkles!
And just as Bakerella recommends, place the cones at this point in the freezer for about 10-15 minutes to speed the hardening process along before applying the next layer of chocolate.
Melt the brown chocolate.
Now add a small amount of the melted chocolate over the top of the cone.
Place mini M&M on top and you are all done!
Oh yeah! I threw in a few of these for good measure! =D
Ice cream cones and smiles,

August 8, 2011
Mustang Bullit Car Cake Tutorial
This Mustang Bullit car cake was commissioned by a beautiful young bride for her fanatical Mustang GT collecting groom. The cake ordered was the groom’s favorite flavor, banana with vanilla bean butter cream, and it was modeled to match the car driven by Steve McQueen in the 1968 movie Bullit.
She swiped the collectable model from his trophy chest and I kept it in my possession for about 6 weeks. I was glad that it wasn’t one of the real Mustangs he had sitting in his driveway=D
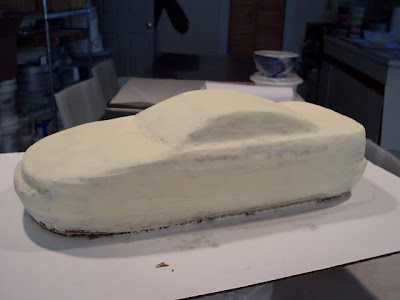
This post is not so much a tutorial but a “get a clue “of how a car cake is constructed and decorated. I'll also share some of pearls of wisdom I begrudgingly gained.
I’ll tell you from experience, it’s not quick and it’s not easy making car cakes! It takes planning, planning and more planning. Did I mention prepping?
Carving is a slow and deliberate job. You begin with a big, stacked rectangular sheet cake and out of that block of cake should emerge a car. Funny, right?
As I had mentioned in a previous post, a good and sturdy made-from-scratch cake is necessary for carving. Box mixes and sponge cakes will NOT work. Neither will recipes with nuts or chocolate chips as they tend to become “road blocks”, if you will, during the carving process.
Chunks of cake will come off with the nuts or chips embedded in your knife and then you’ll have to plaster it back on with butter cream creating an uneven surface. Not to mention, you would have created a really messy cake for the guest of honor to cut into it and serve. Huh-llo.
Be sure to have plenty of room in your fridge and freezer for the cake to rest between carving and applying butter cream layers, cause it’s going to be in there a lot. It took me two days!
Modeling chocolate was used for details. I really liked the way the tires turned out. Black modeling chocolate with silver dragees for spokes! Great medium to work with and eat!
Needless to say, the chocolate in different colors should be ready and waiting before you to begin detailing your carved cake. A ‘How to make your own modeling chocolate’ tutorial is in the works by yours truly=) So look for it in future postings!
Matching the color on the fondant was intimidating to me at the time. I learned, the hard way, to begin with a smaller amount of fondant, achieve the color you wish THEN add it to a larger amount of fondant. You have less waste if you mess up the color initially with a small amount rather than throwing out about 15 lbs of expensive fondant=(.
Another thing I learned during this process, the value of using a foam core board instead of a couple of cake rounds to place the cake on. When I removed the finished cake from the fridge, the weight was too much for flimsy corrugated cardboard rounds that were cut to size.
Two very large and unattractive cracks developed at the bottom corners of the windshield. Great. I cut a piece of styrofoam, made it match the finished cake board and placed it under the hood of the car for extra support!
Once I got to the wedding location, I used Duff's, the one and only Ace of Cakes, suggestion of coloring royal icing to match the fondant, filled the cracks and smoothed it out. Done.
The bride was positively radiant and thrilled to surprise her groom! I wish I could have seen his reaction!
Happy Decorating!

Subscribe to:
Posts (Atom)
